DJD Design

Interiors. Events. Graphics.

Category Archives: Green Design

Shop, shop, shop!

Well, we all know that most designers just love to shop, but sometimes we can come across a client who loves shopping just a bit more! One of my dearest clients, Nancy, brought to my attention a fun and graphic picture framing idea just a few weeks ago. To be honest, the idea surprisingly never even crossed my mind and it made me realize…I must not shop enough!

So, I would like to share with you all what Nancy and I are up to at her place! We are framing shopping bags! Bright and beautiful, graphic shopping bags!

If you are a connoisseur of consumerism, you will get a kick out of this!

So before you go throwing away those bags…perhaps you can recycle them for art on your wall!

=)

No pinch in style!

In honor of St. Patrick’s day, a day of feasting and drinking, we bring you a few images of kitchens and dining rooms that won’t pinch your style! =) May you all have a happy, delicious, safe, and green holiday! =)


“Let the Sunshine In!”

In ‘light’ of daylight savings, we are going to be singing “Let the Sunshine In” and sharing with you designs that do just that! As an interior designer, I know it is absolutely essential to properly build/design spaces that utilize natural light. Whether it is in your home, or at work, natural light not only promotes healthier living, but also reduces the amount of energy needed to run a home or business.

Happy Daylight Savings! We hope you have a bright and sunny day! =)

Designing for a Modern Day Artemis

Designing for the Goddess Within – The Influence of Hellenic Archetypes in our Personal Design Aesthetics

We’ve all heard, at some point or another, the names and stories of the Greek gods and goddesses.  Among the most famous are Zeus, Apollo, Aphrodite, and Athena. But what we know about them we usually learned in elementary school, a lit class, or from a Hollywood movie. However, it’s worth taking the time to really understand these mythical gods and godesses when considering a style of design that suits you or a client.

Perhaps it’s due to the fact that part of my heritage is from Greece, but I have always loved ancient Greek myths, learning about philosophy, and of course, the arts. So I want to take the time today to introduce to my readers the notion that the design of a home’s décor reflects the archetype within a personal sense of style.

So what is an archetype you may ask? Archetypes are deep enduring patterns of instinct that underlie our thoughts and behaviors. These patterns in the human psyche, which are expressed in myth, remain powerful over long periods of time and transcend cultural eras. Archetypes can also be detected in dreams, literature, and art, where they communicate to us through many symbols. Because archetypes are composed out of the unconscious source of symbols, they attract personal energy, structure it, and spur creativity. Then they manifest through the work of individual artists, writers, and designers, thereby influencing civilization and culture. (source)

The Greek philosopher Aristotle described an archetype as an original form, from which derivatives or fragments could be taken. In more recent times, Carl Jung and his followers imagined a psychology based on the archetypes.  From studying anthropological and archeological reports of their times, they wove an understanding of the psyche and its potential. They observed how the ancient gods of polytheistic religions, and themes found in old tales, might influence modern life with regard to soul, psyche, dreams and the Self. “In Jung’s psychology an archetype is an inherited pattern of thought or symbolic imagery derived from the past collective experience and present in the individual unconscious.” (source)

Inspired by these concepts, I thought it would be interesting to design a home for the archetype within a person. First, of course, I would get to know about the client’s history, personal likes and dislikes, and over-all goals.  Then, I would match that information to the patterns of one of the familiar Greek gods or goddesses, the archetypes of Greek mythology.  Let’s say that a client loves nature and animals and has an independent spirit with eclectic tastes. The client would then be matched to Artemis.

Who is Artemis? Artemis is the Hellenic goddess of the hunt, wild animals, and wild places. While she assisted women in childbirth and protected all young animals (including humans), she also represented a virginal purity. She had an introverted and independent temperament. In artwork, Artemis is often depicted as a huntress with bow and arrows. Deer were sacred to her, roaming free in her sanctuaries.  Her domain is nature, so a person with a strong Artemis influence might have interest in some of the following:  outdoor activities, young children, animals, wildlife conservation, environmental protection, and women’s communities. This type is earthy, adventurous, athletic, but also guards her solitude. (Click Here for More Information about the Goddess Artemis)

So now, designing for the goddess within the client—a modern- day Artemis’ design aesthetic and décor might include:

  • Natural elements: Wood floors, with animal print rugs, or natural fiber rugs (wool, sisal, jute)
  • Antlers, artwork or photos depicting animals or nature
  • Pet and kid friendly furniture
  • Live plants
  • Indoor fountain or water features
  • Natural stone elements (facades)
  • Exposed wood beams
  • Unfinished/rustic/natural wood furniture and finishes (bleached woods)
  • Patterns that emulate the light and dark of a forest: Black and white prints, spotted or striped (animal print) or leafy patterns
  • Earth-tone color palette — or a lot of white (symbolizing purity)
  • Windows that have views of nature or anything interesting with no heavy drapery. Just clean, unobstructed views.
  • Spaces that give a sense of retreat

In conclusion, one thing to keep in mind, archetypes occur in combinations in most people, therefore, one could posses traits of Artemis mixed with, for example, Athena and/or Persephone. So brush up on your ancient Greek myths before you try decorating your house based on your inner gods or goddesses.

Below is a collection of interiors that have been chosen to help illustrate types of spaces that would suit a modern day Artemis.

ARTEMIS INSPIRED KITCHENS

ARTEMIS INSPIRED LIVING ROOMS

ARTEMIS INSPIRED BEDROOMS

ARTEMIS INSPIRED BATHROOMS

ARTEMIS INSPIRED KID’S ROOMS

Leaving it all on the shelf!

Well ladies and gentlemen, we’ve made it to 2012!! Happy New Year!

We are very excited for this upcoming year, and to kick things off, we are going to give you this metaphor to cook with…

Rip down the doors of 2011, and expose all of the goodness that 2012 has to display before you on the shelves!!

“What the hell are we talking about here?”,  you ask.  OPEN shelving for your kitchen!

We know that money is tight these days and that most of us just can’t afford to be spending tons of money to update our kitchens, so we are here to let you know…U DON’T HAVE TO!!

If you are ready for a fresh, updated look in your kitchen, start stripping!…stripping off those cabinet doors, that is. By simply removing some of your cabinet doors, installing lighting, and organizing your dishes/spices/pots, you can give your kitchen the face-lift of the year!!

Not only will this give your kitchen an updated, contemporary feel, but it help you liberate all of the 2011 you’ve been hoarding in your cupboards!! =)

Below you will find a small photo compilation of open shelving concepts to help inspire you.

So, happy 2012 folks!! Let’s get this year’s ‘design must’ cookin!


DIY Party Designs by Dimitra D

This past June, I was hired to design and coordinate a retirement party for a retiring LAUSD (La Unified School District) ESL teacher. This was a late afternoon/evening event that was fully catered, and had a guest list of over 50 people. With a little ingenuity, some simple DIY tabletop decor, and a beautiful house to host the event at, the party was a huge success!

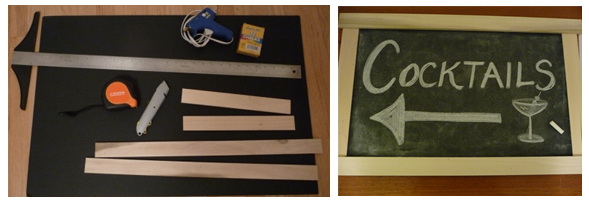
Homemade faux chalkboards signs were made to give that “teacher” feel to the party, and table tops featured cacti in a ‘succulent summer’ theme.

Here are some photos from the event, and some tips on how to create simple, elegant, eco-friendly tabletop decor for your next event! =)

DIY Chalkboard Signs:
How to make (up to 4) faux chalkboard signs for under $20:

  • Black poster board & chalk (pk of 2 @ Office Depot)
  • Pre-cut wood (1/4″ or 1/2″ wide  & 1/8″ thick @ Home Depot)
  • Hot glue gun & glue sticks
  • T-square, tape measure, utility knife

First, cut the wood into sections for the frame. You can also have the wood pieces pre-cut for you at your local Home Depot Center. I had 14″ strips for the top and bottom pieces, and 8″ strips for the sides (this worked for the size of the board I got at Office Depot, which I sliced in half in order to get two signs out of 1 poster board).

Next, create a frame by gluing the wood to the surface of the poster boards, using the hot glue gun. Be sure to put a generous amount of glue on the boards and quickly apply the wood before the glue dries.

Once you have the poster framed, take a stick of chalk sideways, and rub it sparingly all around the surface of the poster board. Then, rub the poster down with your fingers to even out the chalk. This gives the black poster board that “chalkboard” look. Finally, you are free to write whatever you need to write on the board, and make your event a success! You can also re-use the signs by wiping off and erasing your writing with an old towel (completely DRY!), then creating a new message.

DIY Simple Succulent Tabletop Decor:

  • Lanterns ($14.99 for large and $7.99 for small @ IKEA)
  • Candles
  • Dried flower pedals (from garden)
  • Dinner mats ($2.99 each @ IKEA)
  • 4″ Succulents ($2.99 each @ IKEA, or at your local nursery/home depot)
  • Hot glue gun & glue sticks
  • Rope (Home Depot)
  • Old Table Cloth/Fabric
  • River Rock

I began by taking an old table cloth, and cutting it into sections to wrap the plastic succulent pots. I then glued the fabric to the plastic pots with the hot glue gun, covering plastic completely. Next, I wrapped twine around the pots…gluing it at a starting point on the top, periodically as I wound it down around the pot, and again at the bottom finishing point. You will probably have excess fabric sticking out at the top, which I chose to cut flush with the top of the pots. This project is a tad time consuming, but a really nice alternative to buying new pots! =)

The last design objective for this retirement party was to create an eclectic lounge area for guests to enjoy cocktails before dinner was served. All of the furniture already belonged to the client, and was simply gathered and arranged in the empty basement of the house where the party was being held.

I had 1920/30’s movie posters printed ($9 each @ Office Depot) of actors like Charlie Chaplinand Cecil B. DeMille, who once gathered at this historic residence where the party was held.

Hope you enjoyed these simple DIY party design ideas. For more information please feel free to contact me at  http://djd-design.com/Contact.html or friend DJD Design on facebook @ http://www.facebook.com/pages/DJD-Design/210315872316907?ref=ts

Happy Summer!

Go Green…Go Gravel!

Ever since I fired our gardeners and took over the gardening duties at our house, I have taken it upon myself to push my green interior design ideas out the door! Literally!

It’s hard to imagine that a garden could have a negative impact on the environment, but it’s easy for a harmless-seeming garden to cause environmental damage. Living in California, we have all the opportunity and all the incentive to ‘go ‘green’ in our gardens/yards. Since we have optimum weather, it has pushed me to explore the ideas of creating an optimum outdoor living space that will help reduce our water expenses!

The sun beats down on us day in and day out, which we love…that’s why we are in Cali, but!…let’s soak it up without it wasting our precious dollars on watering & maintaining unnecessary and nonfunctional landscapes.

This post is about going green in our gardens to help save green in our wallets. The biggest money pit of all are our LAWNS! SO! I hope to inspire you to get rid of that lawn and go green with gravel!

Gravel patios, outdoor dining areas, and terraces, are great ways to live a frugal outdoor life! Here are some beautiful photos of gravel patios that I have gathered as inspiration for turning my garden into a ‘green garden’ with gravel.

Pack Your Bags & Explore the Eco-chic Side of Design!

Destination: Island of Shabby-chic Suitcases

We all have dusty old suitcases buried somewhere deep in the darkest part of the house, out of sight, sitting completely empty, or filled with forgotten items. Well, the time has come! Bust out that suitcase because you just won a trip to paradise! Oh…wait…no…I’m sorry…wrong blog.  Let’s try that again.  The time has come, to bring out those old suitcases and get some use out of them by repurposing what was once fabulous!…There, that’s better.

I’ve always liked the shabby chic look of vintage suitcases, but what I love even more is repurposing those suitcases to be used as furniture pieces such as:

  • Side Tables

  • Speakers

  • Planters

  • Cat/Dog Beds

  • Cabinet

  • Bookshelf

Here are some photos of repurposed suitcases that are sure to make you rethink and repurpose that old dusty suitcase in your basement. Remember, if you think the fabric or outside material is ugly , you can always paint them a fun color! Plus, keep using them as storage and add cute tags to the handles to let you know what you have kept inside.


Mega Design Service Discount for the month of JUNE!!

Decorating the Inside with the Outside!

Decorating the Inside with the Outside!
How to Create Fun Flower Arrangements!

Creating a flower or plant arrangement with plants from your garden is an easy and inexpensive (because it’s free) way to spruce up your house. Whether it is an arrangement for on dining table, side table in the living room, a dresser in your master bedroom, or in a guest bathroom, it is sure to be delightful!

My biggest advice: Remember not to fuss! Garden flower arrangements should look whimsical and free, and I’m going to tell you how! So let’s pick up some shears and get snippin!

1.     Pick flowers from your garden that have long enough stalks for the vase you are thinking of using. Look at the colors and textures in your garden and pick a complementary vase that highlights your blooms best features. Do you have sweet pink roses? Then choose a stunning bright blue/green/purple vase to set off their color. Do you have lavender plants? Show off their tall bushy stalks in a glass vase. Again…don’t over think! Pick what feels right to you.

2.     Snip your lovely dewy flowers in the early morning or evening. Flowers cut during midday will wilt more easily. Once you have the plants you want to use, clean them up! If there are some already dead or wilting flowers, snip them off. Cut the ends of the stems off at an angle. Snipping them this way exposes more of the stem’s surface area, so the flower can more easily suck up water. Place the flowers in your vase filled with lukewarm water.

3.     Arranging should be fun and relaxing! Not a ‘project’. Arrange in a way that speaks to you. The key to a good lookin’ arrangement is a full vase. If you want a more minimalist look though, choose flowers with long graceful stems and place them in a tall skinny vase. I believe the less you fuss over arranging will help create the perfect arrangement. Add a flower at a time, layering them over each other and turning them so that the arrangement stays round. I like arrangements that look denser in the middle and more airy toward the edges. I particularly like the look of full budded flowers. 

4.     You can also add some texture to your arrangement by incorporating other elements (pretty much whatever you can find!) Weave foliage, buds, leaves and other clippings from your garden into the bouquet.

5.     Don’t forget, an arrangement can be of just one plant as well. Lavender and Rosemary bushes make lovely arrangements for a guest or master bathroom!